Garlicky Angel Hair with Roasted Broccoli

Garlicky Angel Hair with Roasted Broccoli

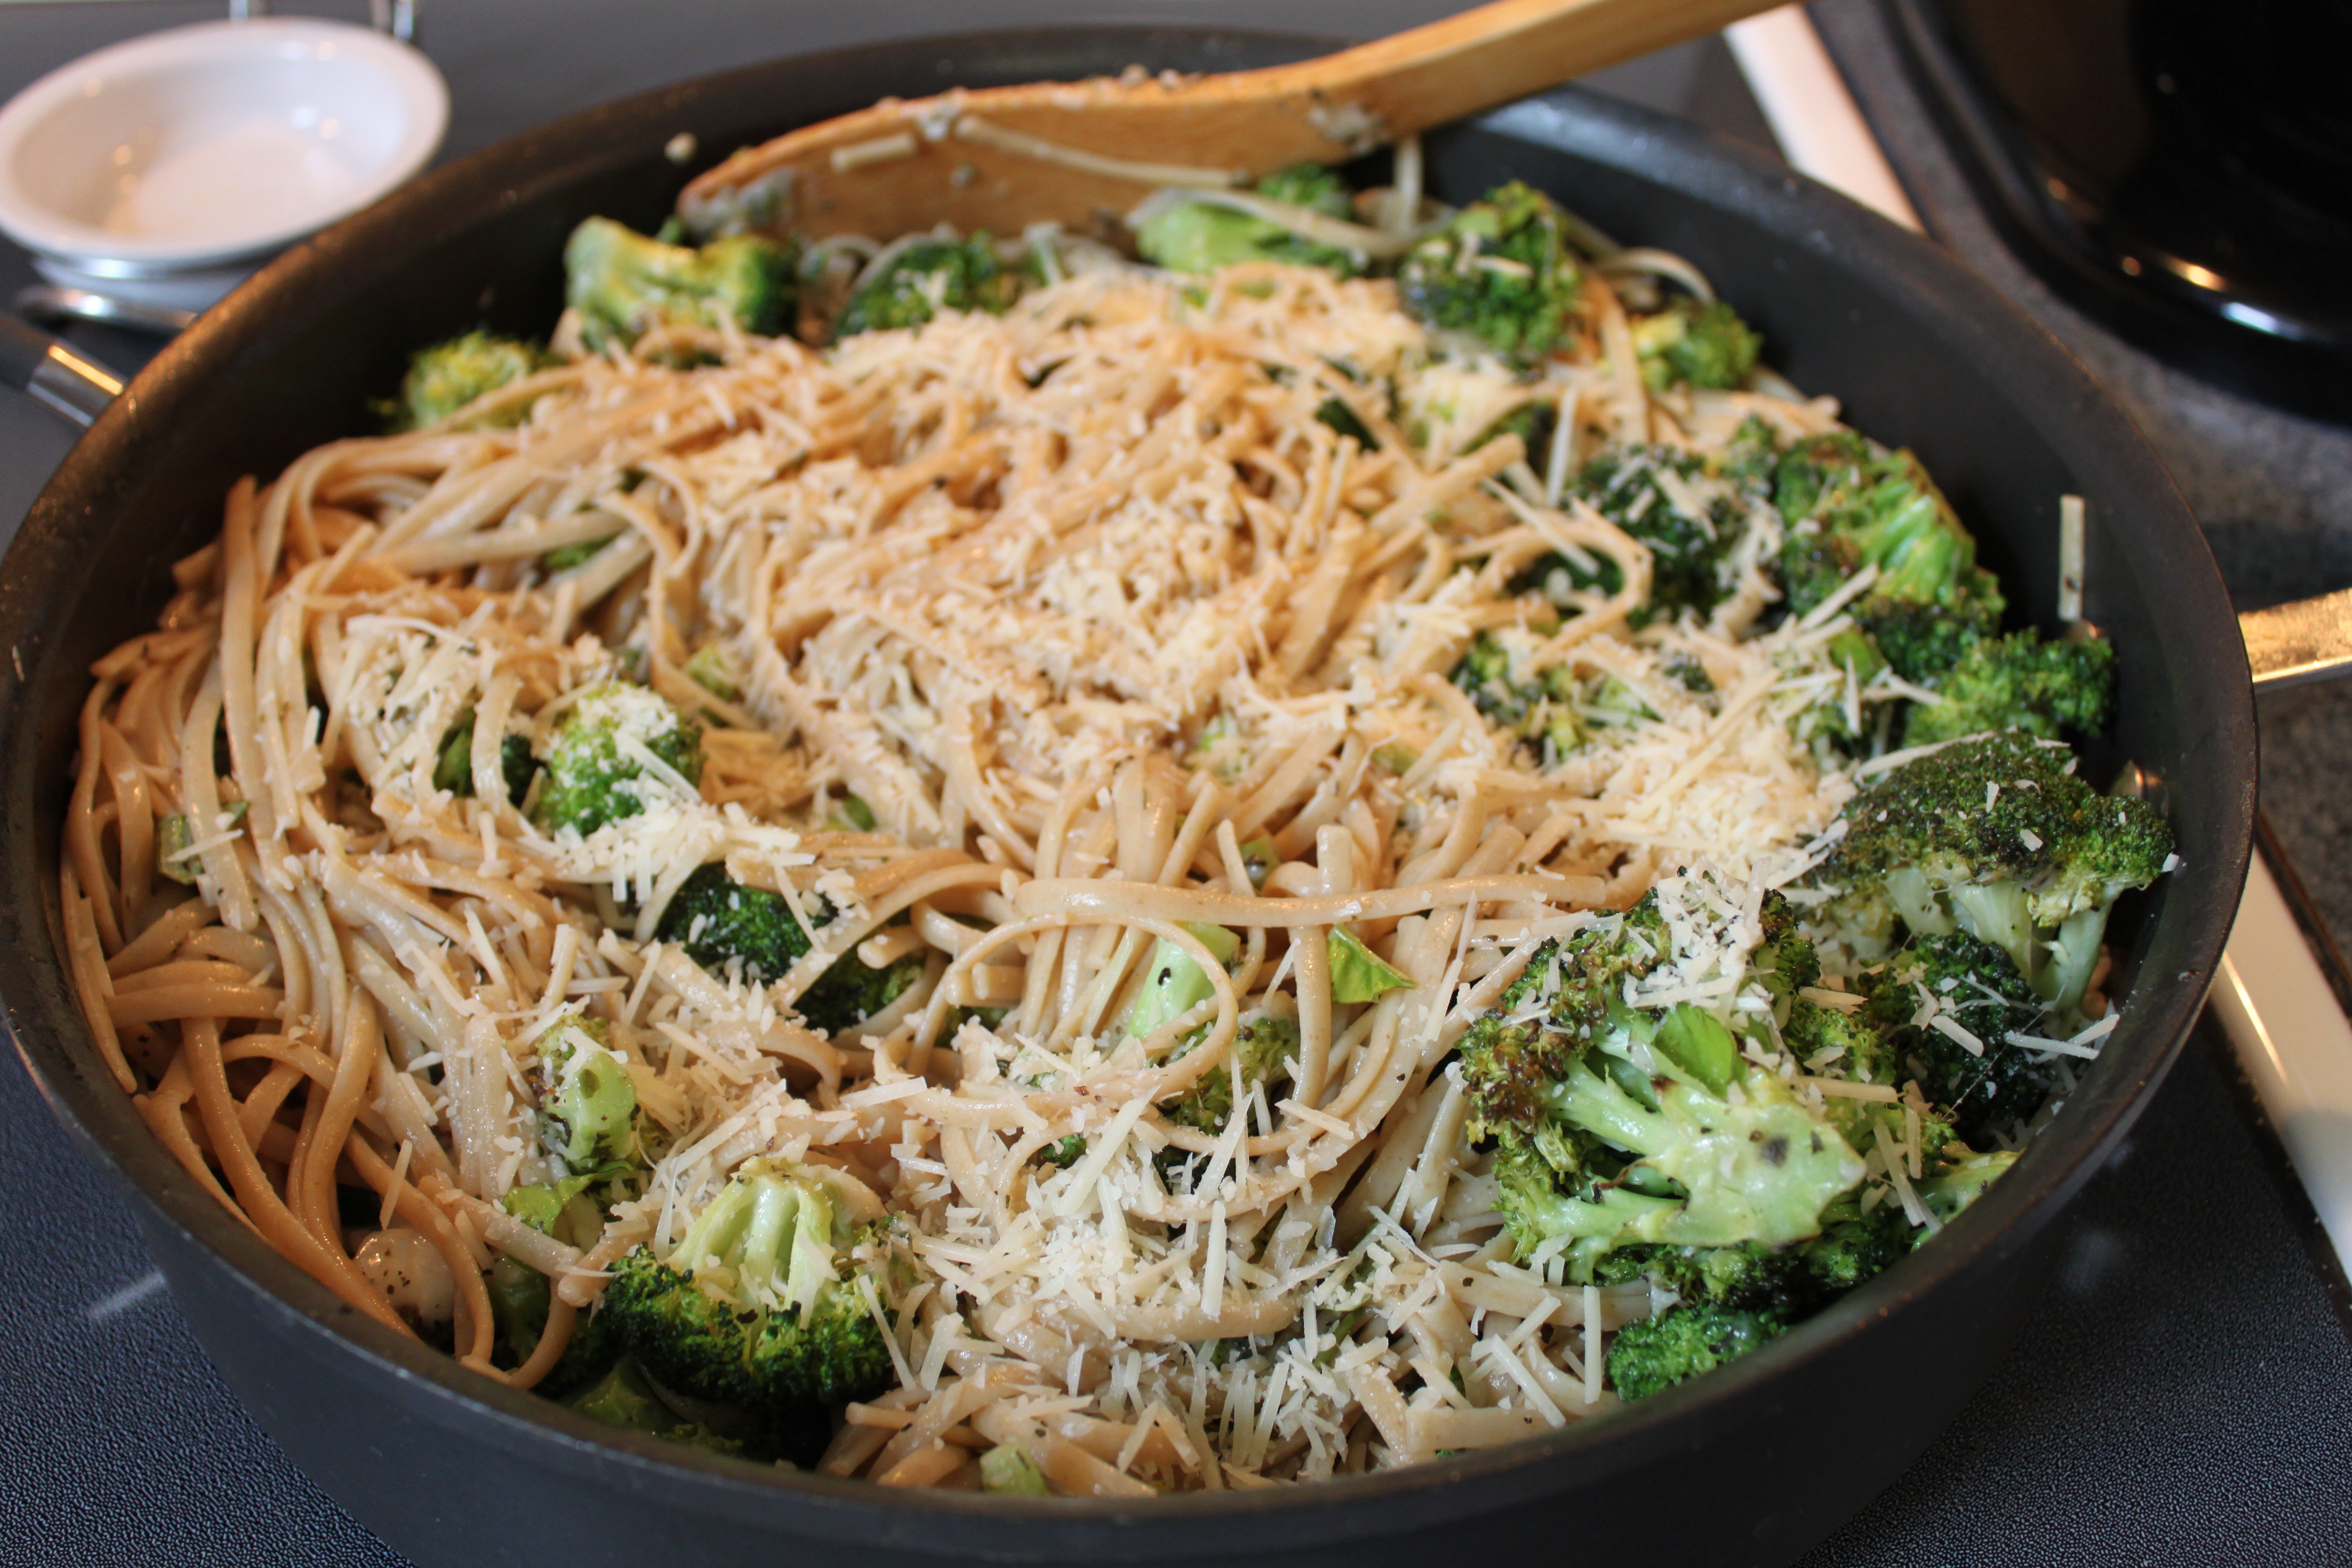
Dinner brought to us last night courtesy of “All You” magazine and the recipe website “My Recipes”.  It was tasty and not difficult to make but my house still smells like garlic this morning!

1 (12 oz) package fresh broccoli florets (I doubled this amount)

6 tablespoons olive oil (I ended up using 7 since I used more broccoli and more pasta)

1 tablespoon Italian seasoning (I used 2)

salt

8 ounces angel hair pasta (I used a 13 oz box of whole grain linguine)

10 cloves garlic, thinly sliced (I used about 5 and that was plenty)

1/2 teaspoon crushed red pepper (left this out)

1 cup grated Parmesan (I used more, probably 1 1/2 cups)

2 tablespoons fresh basil

1  Preheat oven to 450.  Line a large rimmed baking sheet with foil.  Combine broccoli, 1 (or 2 if you’re using more broccoli) tablespoon(s) olive oil and Italian seasoning in a large bowl and toss to coat.  Place broccoli in single layer on baking sheet.  Roast, stirring once or twice, until broccoli is crisp tender and beginning to lightly brown, about 15 minutes.

2  Bring a pot of salted water to a boil.  Cool pasta until al dente, about 4 minutes or as package directs.  Drain, reserving 1 1/2 cup pasta cooking water (I kept 2 cups just in case).

3  Warm 3 tablespoons olive oil in a large Dutch oven over medium heat.  Saute garlic until just golden brown,  about 2 minutes.  Remove from heat and stir in red pepper, 1 teaspoon salt, 1 1/4 cups (I used about 1 1/2) reserved pasta water and remaining olive oil.  Add pasta and 1/2 cup cheese (I added about 3/4 cup cheese); simmer over medium heat, tossing gently, until sauce thoroughly coats pasta (add remaining pasta water if needed), 2 – 3 minutes.  Remove from heat and toss in broccoli, remaining cheese and basil.

Balsamic Chicken Salad

balsamic chic salad

This, this right here, is heaven in a bowl.  Seriously yummy salad.  Such a good combination of flavors.  I found the recipe in a recent issue of “All You” magazine and then tracked it down online and pinned it.  You can find it here, on the “My Recipes” website.

3 zucchini (6 oz each), cut lengthwise into 1/4″ thick slices

1 head fennel (about 12 oz), sliced 1/4″ thick (I used a yellow onion instead)

1/4 cup extra virgin olive oil

salt and pepper

1 small rotisserie chicken (about 2 pds) (Bob barbequed 3 chicken breasts for the salad)

1 (5 oz) container mixed salad greens (I used 2 Romaine hearts)

10 ounce cherry tomatoes (about 2 cups), halved (I used 2 large Roma tomatoes)

1/3 cup pitted Kalamata olives (2 oz), each sliced in half lengthwise (left these out)

6 ounces fresh mozzarella, cut into 1/4 ” pieces (Costco has this)

1/3 cup roughly chopped basil leaves (this was one of the best part of my day as I stepped outside and cut fresh basil right from my garden!)

3 tablespoons balsamic vinegar

1 1/2 teaspoons sugar

1  Preheat grill to high.  Toss sliced zucchini and fennel in 1 tablespoon olive oil and season with salt and pepper.  Grill (in batches, if necessary) until just tender, 2 – 3 minutes per side for zucchini, 3 – 4 minutes per side for fennel.  Remove from grill and let cool slightly.  Cut crosswise into 1/2″ pieces.

2  Remove skin from chicken, pull meat from bones and shred meat.  In a large bowl, mix chicken with greens and grilled vegetables.  Toss in tomatoes, olives, mozzarella and basil.

3  In a small bowl, mix vinegar, sugar and 1/4 teaspoon each salt and pepper.  Stir to dissolve sugar.  Add remaining 3 tablespoons olive oil, whisking to combine.  Drizzle vinaigrette over salad, toss and serve.

(The recipe suggested that if you had leftovers, you could serve them the next day as a wrap in a tortilla.)

Save

Baptism Cross Fondant Cake

Rome's baptism

Remember the reveal the gender beehive cake that Courtney made for her friend Brie?  Well, Brie’s friend Nina was at that shower and loved that cake so she called to ask if we would make a baptism cake for her little baby Rome.  She wanted a cross so we found a Wilton cross cake pan at Michaels which worked beautifully.  She just wanted something simple with his name on the cake so Cort added the bow which was perfect.  I really like the clean lines of this cake, I think it looks so elegant.  The cake is our favorite While Almond Sour Cream cake recipe (without the almond) and our favorite buttercream frosting.  The fondant is the Pettinice brand from Funfinity and the blue is part Duff’s blue fondant and part Pettinice white fondant mixed together.  The cross cake wasn’t big enough to feed everyone so we made her another square cake of chocolate to match.  Nina asked for the date to be on that one and Cort added a bow so it would match the cross cake.  Congrats to Nina and little baby Rome and family on Rome’s baptism!

Rome's baptism

Summertime Cupcakes

summer cupcakes

All the Young Women were over at my house last night for our last camp activity of the year aka Camp Wrap Up.  We had dinner, a short program, swimming, cupcakes and then watched our camp movie and a good time was had by all!  It’s not a Young Women activity without treats so I decided to get creative with cupcakes.  I found this idea on Pinterest (of course) from a blog called “Party Pinching” which has some adorable ideas.  I combined two of her cupcake ideas onto one cupcake for a summertime theme.  The cupcakes are a Pillsbury Pink Lemonade cake mix (I added the zest and juice from one lemon to it to give it an extra lemony kick) and the frosting is my favorite Buttercream Icing tinted green.  I got the straight baking cups (so cute!) from a website called “Pick Your Plum” which has adorable daily deals.  The little paper umbrellas I already had in my cake/cupcake decorating stash but I’m pretty sure they came from Partyland or Zurchers.

Pez Flip Flops

I found the pink pez at Zurchers and the flower shaped sprinkles at Michaels.  Just attach a flower sprinkle to the end of each of your pez with a dab of frosting or white chocolate.

Mike and Ikes Popsicles

I bought a box of Mike and Ikes at the dollar store.  She used flat wooden toothpicks for her Popsicle sticks but I was nervous about someone just popping the whole thing into their mouth and eating the toothpick as well so I used some whole wheat spaghetti noodles which worked really well and looked great too.  I used my cake tester to push a hole into the flat end of a candy and then inserted the noodle piece into the hole.  Also I found that the candies lost their shine from being handled so much so I used a paper towel to hold them so that they would retain their shine.

Here’s a closer look at the decorations:

summer cupcakes

White Chocolate Cupcakes with Truffle Filling

White Chocolate Cupcakes with Truffle Filling

And now for my favorite part of any party or bridal shower as the case may be, the dessert!  These are a Pampered Chef recipe from their cookbook called “Chocolate” of course!  They were awesome, super sweet, just a warning and if that warning is coming from me then you know that they must be sweet because I have a super high tolerance for sweet!  I made the white chocolate decorations on the cupcakes with candy melts and a mold that I found at Michaels.  They were sort of a pain to make because the molds were so skinny but I ended up putting the candy melts in a ziploc bag and snipping the corner off in order to get the chocolate into the molds with a minimum of mess but it was worth the trouble because they really made the cupcakes look awesome.  I also sprinkled edible glitter on them too so they were a bit sparkly!  I loved the way they look and tasted too!

cupcakes

1 3/4 cups cake flour (didn’t have any and Winco didn’t have it so I just used regular flour)

2 teaspoons baking powder

2/3 cup whole milk (I only had 1% so that’s what I used)

1/2 teaspoon vanilla

4 egg whites, room temperature

6 tablespoons butter, softened

1/2 cup sugar

1/4 cup sour cream

12 round white, milk or dark chocolate truffles, unwrapped (I bought a bag of those Lindt Lindor truffles of all three flavors)

frosting and garnish

6 oz white chocolate, chopped (I used the white candy melts because I had them out and already melted for the decorations)

1 (8 oz) package cream cheese

1/4 cup butter, softened

1/2 teaspoon vanilla

2 cups powdered sugar

white chocolate curls or molded decorations

1  Preheat oven to 325.  Place paper liners in 12 wells of muffin pans (I actually got about 16 cupcakes).  Whisk flour and baking powder together.  Combine milk and vanilla in separate bowl.  Beat egg whites on high until stiff peaks form.  In another mixing bowl, beat butter and sugar on medium high until fluffy; beat in sour cream until smooth.  On medium speed, add flour mixture in 3 additions, alternating with milk mixture in 2 additions, mixing until smooth.  Whisk in 1/3 of egg whites then fold in remaining egg whites with whisk.  Divide batter among liners.

2  Bake 17 – 20 minutes or until wooden pick inserted in centers comes out clean.  Remove pan from oven.  Immediately snip a 1/2″ deep “X” into top of each cupcake using kitchen shears.  Press 1 truffle into each cupcake until flush with top of cupcake.  Remove cupcakes from pan.  Cool 30 minutes or to room temperature.

3  Meanwhile, for frosting, microwave white chocolate, uncovered, on high 1 – 1 1/2 minutes or until chocolate is mostly melted, stirring every 30 seconds.  Let stand 3 minutes or until slightly cooled.  Combined melted chocolate, cream cheese, butter and vanilla and beat on medium until well blended.  Gradually add powdered sugar and beat well.

4  Pipe frosting onto cupcakes and decorate as desired.

Creamy Artichoke Appetizers

Creamy Artichoke Appetizers

The second appetizer I made for the bridal shower last night, this one seemed to be the favorite, it was pretty awesome, like a spinach dip on top of a piece of bread, yummy!  Also from “Betty Crocker”.

3 cups Bisquick

1 1/2 cups shredded Mozzarella cheese (6 oz)

2/3 cup water

2 tablespoons oil

1 1/2 cup mayonnaise

1 1/2 cups Parmesan cheese

1 (7 oz) jar roasted red bell peppers, drained and diced

1 tablespoon Dijon mustard

1 tablespoon Worcestershire sauce

2 teaspoons garlic powder

2 (14 oz each) cans artichoke hearts, drained and chopped

1  Heat oven to 375.  Spray 15 x 10 x 1″ pan with cooking spray.

2  In large bowl, stir Bisquick and mozzarella cheese until thoroughly combined.  Stir in water and oil until dough forms; beat vigorously 20 strokes.  (I had to add a little more water here as I still had Bisquick crumbs at the bottom of my bowl, I think I added a tablespoon or two more of water.)  Let stand 8 minutes.

3  Using hands dipped in additional Bisquick (I didn’t need to do this as my dough wasn’t all that sticky), press dough in bottom and up sides of pan.  Bake 9 – 11 minutes or until crust is puffed and top edges are just starting to brown.

4  Meanwhile, in medium bowl, mix all remaining ingredients except artichokes then stir in artichokes.  Evenly spread mixture over partially baked crust.

5  Bake 12 – 15 minutes or until thoroughly heated and crust is golden brown.

6  Set oven control to broil.  Broil with top of pan 6″ from heat 2 – 3 minutes or until filling is golden brown.  Cool 10 minutes before cutting into squares.

Black Bean and Corn Wonton Cups

Black Bean and Corn Wonton Cups

Had a bridal shower here last night for my friend Brandi who is getting married and moving to Oregon so we had to get all the girls together before she left!  We did appetizers and dessert, here is one of the appetizers I made.  It’s a recipe from “Betty Crocker” and it was really easy to make, party friendly because you can bake the wonton wrappers ahead of time and then just fill right before, and they were yummy!

36 wonton skins (these are located in the produce section of your grocery store, the first time I bought them I wandered around endlessly trying to find them so I thought I’d save you a little time!)

2/3 cup salsa

1/4 cup fresh cilantro

1/2 teaspoon cumin

1/2 teaspoon chili powder

1 (15.25 oz) can whole kernel corn, drained

1 (15 oz) can black beans, drained and rinsed

1/4 sour cream (I totally forgot to add this!)

1  Heat oven to 350.  Gently fit 1 wonton skin into each of 36 mini muffins cups, 1 3/4 x 1″, pressing against bottom and side.  (It didn’t say to spray the pan with cooking spray but I did just to be safe and I used my Pampered Chef mini tart shaper to press the wonton skins into the muffin pan.)  Bake 8 – 10 minutes or until light golden brown.  Remove from pan and let cool.

2  Mix remaining ingredients except sour cream.  Just before serving, spoon bean mixture into wonton cups.  Top each with 1/2 teaspoon of sour cream.

Country Style Vanilla Ice Cream

country style vanilla ice cream

What’s the 4th of July without homemade ice cream?  (Actually this was for the 5th of July as Courtney and Jaren went to the Stadium of Fire on the 4th so we waited a day to do our barbeque and fireworks!)  This is my go to homemade ice cream recipe, you can add anything to it to make it whatever flavor you want, we’ve added Oreos which makes it super yummy!  I’ve had and used this recipe for so long that I can’t even remember where I got it from.

4 eggs

2 1/2 cups sugar

4 cups whipping cream

2 tablespoons vanilla

1/4 teaspoon salt

5 cups milk

Beat eggs until foamy (crank the mixer up a few notches and let it go until the eggs have lots of bubbly foam).  Turn the mixer back down to low or medium and then gradually start adding the sugar, once sugar is all added beat until thick.  Add cream, vanilla and salt and mix well.  Pour into can of ice cream maker.  Add milk and stir.  Mix according to ice cream maker’s instructions.

Farm Animals Fondant Cake

farm cake

My friend Tesla asked if we would make a farm cake for her little boy Grant’s 3rd birthday, we knew this would be a fun one to tackle.  We surfed around on the internet and found some cute ideas and then got to work.  Each layer of the cake has a chocolate layer and a yellow layer so it’s going to look cute even when they cut into it.  The white fondant is the Pettinice fondant which is so nice to work with!  The green is Duff’s fondant.  Courtney made the animals with this new product from Wilton called “Shape-N-Amaze, Edible Decorating Dough” which she said worked really well for sculpting the animals as opposed to making them out of fondant.  My favorite part of the cake is the pig butt poking up out of the chocolate fondant puddle!  Happy Birthday Grant!

Licorice Flags

Licorice Flags

The Young Women from church are coming over tomorrow for breakfast and swimming and since it is the day before 4th of July and since treats are what I do, I thought I’d make them a 4th of July treat to take home with them.  I found the idea on a blog called “Sweet Simple Stuff”.  They were pretty easy to make and turned out pretty cute.  I’m just going to tell you how I did it, you can check out her instructions on her blog if you like.

1 big bag Strawberry flavored Twizzlers

1 bag Wilton white candy melts

1/3 bag Wilton blue candy melts

white sprinkles

clear pretzel treat bags

1  Melt white candy melts according to package directions.  I melted them in a rectangle tupperware container instead of a bowl since the licorice is long.  One bag of Twizzlers made about 13 flag treats so, one at at time, dip 13 pieces of licorice in the melted white chocolate and carefully place on wax paper until set.  I have chocolate dipping tools but a fork would probably work better than a spoon for dipping the licorice in the chocolate.

2  Melt blue candy melts according to package directions.  Dip one end each of 13 licorice pieces in the blue, immediately sprinkling with white sprinkles before setting on wax paper to dry/set.

3  When both the white and blue chocolate are set, assemble flag treats by layering a red licorice piece, then a dipped white piece followed by a blue dipped piece in your pretzel bag to look like a flag.

How easy was that?