Italian Easter Bread

Italian Easter Bread

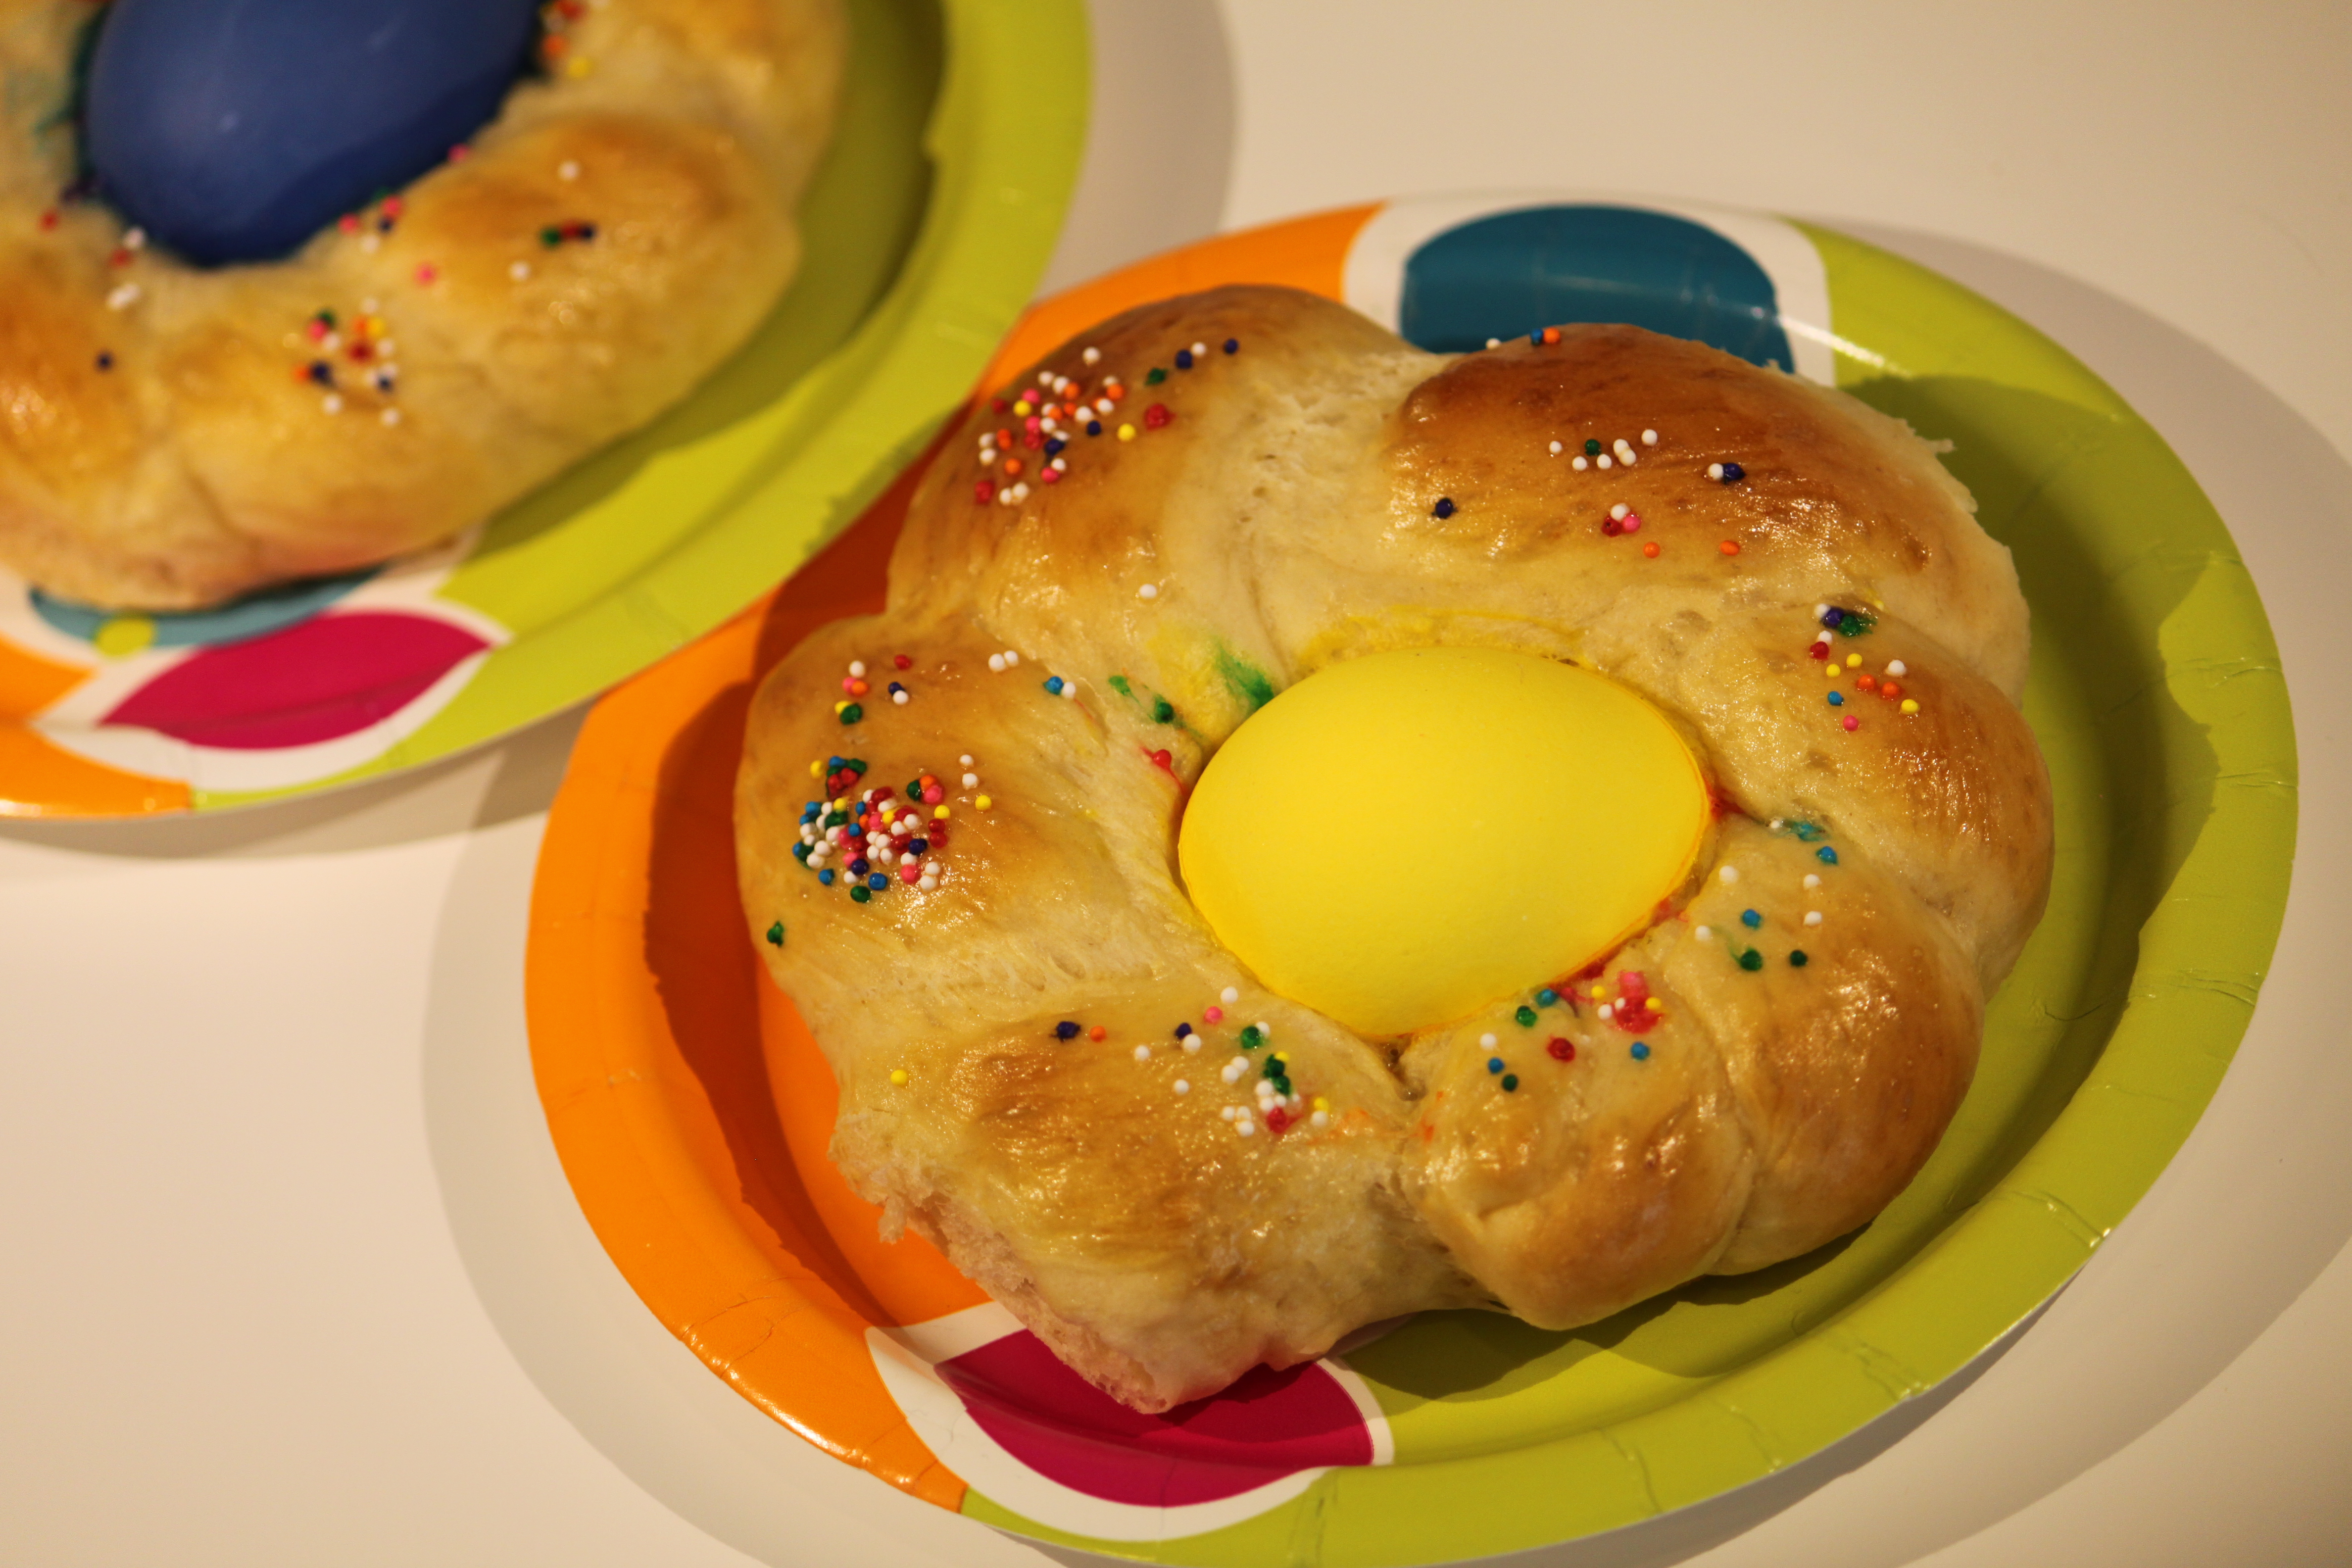
This might be my favorite part of Easter dinner this year, I think they look so yummy and cute!  The recipe comes from a blog called “The Italian Dish”.  I decided to use these in place of dinner rolls this year.  They aren’t hard to make but they are a little time consuming which is why I made them yesterday for today’s dinner.

1 package rapid rise yeast

1 1/4 cups scalded milk, cooled to room temperature

pinch of salt

1/3 cup butter, softened

2 eggs, beaten

1/2 cup sugar

3 1/2 cups flour

1 egg, beaten with 1 teaspoon of water

6 dyed Easter eggs (you do not need to hard boil the eggs first, they will cook as bread bakes)

sprinkles

1  In a large mixer bowl, combine yeast, warm (not hot) milk, salt, butter, eggs and sugar.  Add about half the flour and beat until smooth with dough hook.  Slowly add the remaining flour to form a stiff dough.  Don’t worry about how much flour it ends up being, just keep adding until the dough is not sticky anymore.  Knead until smooth.  Place in a greased bowl, cover and let rise in a warm place until doubled, about 1 hour.

2  Punch dough down and divide into 12 pieces.  Roll each piece to form a 1″ thick rope about 14″ long and, taking, 2 pieces, twist to form a braid, pinching the ends and loop into a circle.

3  Place on a greased baking sheet or line baking sheet with parchment paper or a silpat.  Cover and let rise until double, about 1 hour again.  Brush each bread with beaten egg wash.  Sprinkle the sprinkles over the top.  In the middle of each bread ring, gently place an Easter egg, making an indentation with the egg.

4  Bake at 350 until golden, about 20 – 25 minutes.  Cool on rack.

Chocolate Dipped Peeps

Peep Pops

Here’s a quick Easter treat idea if you’re still needing something to fill Easter baskets tomorrow, Peep Pops!  The idea comes from a blog called “A Bird and a Bean” and is pretty easy.

package of Peeps bunnies

Wilton candy melts, in whatever colors you like

popsicle sticks

mini marshmallows

Melt the candy melts according to package directions.  Insert popsicle stick in bottom of each bunny and dip carefully into melted candy melts, gently shaking excess chocolate off before setting to dry on wax paper.  Cut mini marshmallows in half with knife sprayed with cooking spray and gently press one half onto side of each bunny near the bottom for a tail while chocolate is still soft.  Allow chocolate to set before lifting off wax paper.

I also dipped some Peeps chicks:

Chocolate Dipped Peeps Chicks

For these guys I just dipped the bottoms in the melted candy melts and then rolled them in some Easter shaped sprinkles (grass and eggs) and let dry.  For presentation, I set each into an Easter cupcake liner and then into a clear plastic bag tied with pink Baker’s twine.

Here’s a look at how I packaged the Peep Pops:

Peep Pops

I found those cute tags on “The Crafting Chicks” blog and they were free!  Thanks Crafting Chicks!

Happy Easter everyone!

Easter Chocolate Filled Sugar Cookie Cups

Easter Chocolate Filled Sugar Cookie Cups

I was in the kitchen last night and Bob came down the stairs and asked what I was making, to which I replied, “I don’t know”, he laughed, this happens sometimes around here, I have a thought but it’s not fully formed so I go down to the kitchen and work it out.  Last night it worked out into these cuties.

1 (17.5 oz) bag Betty Crocker Sugar Cookie mix plus ingredients to make cookies (which are 1 stick softened butter and 1 egg)

chocolate filling – Nutella, Hershey Spreads, frosting, whatever you like (I used the Hershey Spreads)

egg shaped Easter candies (I used M&M’s and Cadbury White Mini Eggs)

1  Preheat oven to 325.  Spray wells of mini muffin pan with nonstick cooking spray, I like to use the kind for baking with flour in it.

2  Prepare cookie dough according to package directions.  Using a mini scoop, scoop 1 ball of dough into each well of mini muffin pan.  (This recipe yielded about 42 cookies.)  Bake for about 10 minutes until edges start to brown.

3  Remove from oven and immediately press down centers of cookie balls with Tart Shaper.  Let sit in pan for 15 minutes before removing.

4  When cookies are completely cooled, fill with desired filling using mini scoop then top with egg shaped candies, pressing them into the chocolate so they don’t fall out!

One Pot Parmesan Chicken Pasta with Artichokes and Spinach

One Pot Parmesan Chicken Pasta with Artichokes and Spinach

Dinner last night brought to us by Betty Crocker, very yummy, super cheesy, easy to make.

4 cups water

2 (12 oz each) cans evaporated milk (I used the fat free kind to take the calorie count down a bit)

1 teaspoon salt

2 cloves garlic, finely chopped

1 pound uncooked pasta of your choice (the recipe originally called for ziti)

2 teaspoons cornstarch

2 cups shredded deli rotisserie chicken (I used 1 drained can of Costco chicken)

1 (14 oz) can artichoke hearts, drained and coarsely chopped

10 oz (about 2 1/2 cups) Parmesan cheese (this was a lot, next time I think I’ll cut it in half)

juice of 2 lemons (about 2/3 cup)

2 tablespoons butter (I’m not sure this was necessary so next time I might try it without)

4 cups (5 oz package) baby spinach

1/2 teaspoon pepper

1  In Dutch oven, heat water, 1 can evaporated milk, salt, garlic and pasta to simmering over medium heat.  Simmer 12 – 14 minutes, stirring frequently, until pasta is tender.  (Don’t ever stop stirring frequently the whole time you are making this or the bottom of the pan will scorch.)

2  Beat remaining can of evaporated milk and cornstarch in medium bowl then stir in chicken and artichokes.  Add mixture to Dutch oven, return to simmering and continue to simmer 1 – 3 minutes or until thickened and mixture coats back of spoon.

3  Remove from heat, stir in half the cheese and the lemon juice.  Stir until cheese melts then add remaining cheese and butter and stir again.

4  Add spinach and stir until wilted.

Copycat Waffle Love Waffles

Copycat Waffle Love Waffles

I’m warning you right now, this post is dangerous, once you read it, you will know how to make Waffle Love waffles and there will be no going back.  For those of you who don’t live near me and are unfamiliar with Waffle Love, it’s a food truck that produces the most glorious waffles known to man, no exaggeration!  Bob and I once waited over an hour for a waffle, they are unbelievably delicious!  When I found this recipe on “Oh Sweet Basil”, I could hardly contain myself.  I informed the fam that Waffle Love was happening at our house on Sunday night, no one argued.  On to the goods . . .

3/4 cup whole milk, scalded and cooled to warm milk (you can scald it in the microwave for about 3 minutes)

1 1/2 teaspoons sugar

2 tablespoons warm water

2 teaspoons instant yeast

1 cup unsalted butter, softened

1 tablespoon brown sugar

2 tablespoons sugar

2 eggs, whisked

3 tablespoons honey

3 teaspoons vanilla

4 cups bread or all purpose flour

2 cups Belgian pearl sugar (Bob ordered this from Amazon, just FYI, it’s expensive)

1  Add 1 1/2 teaspoons sugar to milk and water then add yeast, stirring to combine, allow yeast to proof or get foamy and puffy.  (I did this step twice, both times my yeast did not get foamy or puffy, I realized that I had bought quick rise yeast and a Google search informed me that you do not need to proof quick rise yeast, that it needed to be added with the dry ingredients so I followed this step without adding the yeast and then I just added my quick rise yeast when I added the flour.)

2  Beat together butter and sugars then add eggs, honey and vanilla, then add yeast (or no yeast, as the case may be) mixture.  Next I traded out my paddle beater for my dough hook and added 2 cups of flour to the mixture and mixed until the flour was fully incorporated then added the remaining flour (here is where I added my quick rise yeast) and mixed until fully incorporated again.  Cover bowl with plastic wrap and allow to rest for 4 hours, up to 24 hours.

3  After 4 – 24 hours, punch down dough and knead in pearl sugar, separate into 8 – 10 balls (I made them smaller so got about 14 – 15).  Place 1 ball on a hot, greased waffle iron and cook until golden brown (in my waffle iron, each waffle took about 4 minutes).  Serve with your choice of toppings.  We had Nutella, Biscoff, homemade whipped cream and strawberries.  I made the waffles smaller so that we could all experiment with which combination of toppings we liked best.  Here’s a pic of the waffle without any toppings:

Copycat Waffle Love Waffles

You can see how the pearl sugar caramelizes and makes it so crunchy and yummy.

Homemade Whipped Cream, my version

1 pint heavy whipping cream

1 – 2 teaspoons vanilla

4 – 6 tablespoons powdered sugar, depending on how sweet you want it to be

Beat in mixer with whisk attachment on high speed until stiff peaks form.

Southwestern Pasta with Bacon

Southwestern Pasta with Bacon

Dinner last night, recipe courtesy of “My Recipes”,  it was delicious and easy and fast, my three favorite things!

salt and pepper

12 ounces gemelli or other short pasta (I used a 17.6 oz bag)

4 slices bacon, chopped (I used half the package which was about 7 slices)

1 clove garlic, finely chopped

1/2 teaspoon chili powder (I used 1 teaspoon)

1/2 cup low sodium chicken broth (I used the whole 14 oz can)

1 (15 oz) can black beans, drained and rinsed

1 cup frozen or fresh corn

1 cup cherry tomatoes, quartered (I used grape and just halved them)

chopped cilantro, optional

shredded cheddar, optional

1  Cook pasta according to package directions.

2  Cook bacon in large skillet over medium high heat, stirring often, until crisp, about 8 minutes.  Drain off all but 2 tablespoons fat (I just left 1 tablespoon in skillet), add garlic and chili powder and stir for 30 seconds.  Add broth, beans, corn and tomatoes, bring to a boil, reduce heat to medium low and simmer, stirring occasionally, until heated through, about 3 minutes.

3  Add pasta to skillet, tossing to coat.  Season with salt and pepper.  Sprinkle with chopped cilantro and shredded cheddar, if desired, and serve with lime wedges on the side.

Buttermilk Waffles

Buttermilk Waffles

This recipe came in the mail this week in the Thanksgiving Point Gazette so I decided to give it a try yesterday since I had buttermilk in the fridge leftover from the Whoopie Pies.  They were the best waffles I’ve ever made!  Take your time and follow the directions carefully so that you get the right texture and fluffiness.

2 cups flour

1/4 cup packed brown sugar

1 1/2 teaspoons baking powder

1 teaspoon baking soda

1/2 teaspoon salt

3 eggs, separated

2 cups buttermilk

1/2 cup butter, melted

1 teaspoon vanilla

1  Mix together flour, sugar, baking powder, baking soda and salt and set aside.

2  Beat egg whites until stiff but not dry.

3  In a third bowl, whisk together egg yolks, buttermilk, butter and vanilla.  Pour this wet mixture into bowl with dry ingredients and stir briefly until just combined.  Carefully fold whites into batter.

4  Pour 2/3 – 3/4 cup batter into waffle maker and cook according to waffle maker instructions.

(I didn’t have any berries to make this syrup but here’s the recipe for future use.)

Mixed Berry Syrup

1 cup sugar

1 1/2 tablespoons cornstarch

3/4 cup water

1 1/2 cups frozen mixed berries

Combine sugar and cornstarch in saucepan.  Stir in water and add berries.  Bring to a boil and stir until syrup begins to thicken.

Whoopie Pies

Whoopie Pies

This weekend is General Conference for our church, if you are curious about that, you can click here to find out more.  There’s this website that I love called “All Things Bright and Beautiful” which I subscribe to and she sent out this adorable reminder tag for the Young Women at church about General Conference with an Oreo cookie on it so I decided to make Whoopie Pies with my new Wilton Whoopie Pie pan for the girls.  (I’ll put a picture at the end of the post of the bagged treats with the cute tags.)  Since I was using the pan for the first time, I thought I’d go with the Wilton recipe on the box.  The pan and the recipe both worked out great as you can see!

Whoopie Pies

1/2 cup (1 stick) butter, softened

1 cup firmly packed brown sugar

1 egg

1 teaspoon vanilla

2 cups flour

1/3 cup cocoa

1 teaspoon baking powder

1 teaspoon baking soda

1/2 teaspoon salt

1 cup buttermilk

1  Preheat oven to 350.  Lightly spray pan with cooking spray.

2  Beat butter and sugar on medium until light and fluffy, about 3 minutes.  Add egg and vanilla and beat until well combined.

3  In a separate bowl, sift together flour, cocoa, baking powder, baking soda and salt.  Add half the dry ingredients into butter mixture and mix on low speed.  When dry ingredients are almost incorporated, stop mixer and add buttermilk.  Continue to mix on low speed until all ingredients are almost incorporated.  Stop mixer and add remaining dry ingredients.  Mix on low until just combined.  Spoon 2 tablespoons of batter into each cavity (Pampered Chef Medium Scoop worked great for this) and spread batter to edges (I spayed the bottom of a drinking cup with cooking spray and used that to spread the batter).  Cavity should be about 2/3 full.

4  Bake 8 – 10 minutes or until top of cake springs back when touched.  Allow cakes to cool in pan 8 minutes.  Prepare filling while cakes cool completely.

Yields 12 Whoopie Pies, 24 cakes total

Whoopie Pie Filling

6 tablespoons butter, softened

1 1/2 cups powdered sugar, sifted

1/8 teaspoon salt

1 (7 oz) jar marshmallow creme

1 teaspoon vanilla

food coloring, if desired

Beat butter until creamy.  Add sugar and salt and mix well.  Add marshmallow creme and vanilla and blend well.  If desired, add food coloring.  Use immediately to fill whoopie pies.  (I used my Pampered Chef medium scoop here to fill the whoopie pies and again, it was just right.)

General Conference reminder treat

So here are the Whoopie Pies all bagged up, in cute bags from “Pick Your Plum” another of my very favorite websites, ready to go for all the Young Women!

Pasta with Broccoli Pesto

Pasta with Broccoli Pesto

This doesn’t necessarily look all that appetizing but believe me, it was delicious!  The recipe for the Broccoli Pesto comes from a blog called “One Perfect Bite”.  We ate it warm last night but I’m sure it will be just as good cold today for lunch.

1 pound broccoli florets

1/2 cup chopped toasted walnuts (you can toast walnuts easily in the microwave for about 3 – 4 minutes, stirring frequently, when they start to smell really good and are sizzling then they’re done)

2 large cloves garlic, chopped

2 tablespoons fresh lemon juice

1/4 teaspoon salt

3/4 cup extra virgin olive oil

1/2 cup grated Parmigiano Reggiano cheese

1  Bring large pot of well salted water to boil.  Add broccoli and cook for 2 minutes.  Drain broccoli and set aside.

2  In food processor or blender, combine broccoli, walnuts, garlic, lemon juice, and salt.  Pulse until broccoli and nuts are finely chopped.  Then, with motor running, pour in olive oil in slow stream.  Mix in grated cheese.

3  Cook a bag/box of your favorite pasta according to package directions and serve with pesto.  You can also serve it over bread or on chicken or fish.  Pesto will keep in fridge for about 3 days.

Yields about 1 1/2 cups

Penne with Tuna, Capers and Beans

Penne with Tuna, Capers and Beans

Dinner last night brought to you by “My Recipes”.  I didn’t have all of the ingredients but it still tasted surprisingly delicious, I’m pretty sure Zach had thirds!

salt and pepper

12 ounces penne (I used more, I think the package was like 16 – 17 oz)

1 (5 oz) can tuna packed in oil, not drained (I used a 7 oz can packed in water)

1 (15 1/2 oz) can cannellini beans, drained and rinsed (I used Great Northern instead)

2 tablespoons capers, chopped (didn’t have any)

2 teaspoons lemon juice (I used more, the juice of 1 whole lemon so probably 1/4 cup-ish)

1/4 cup extra virgin olive oil

2 tablespoons Parmesan

several fresh basil leaves, torn into large pieces (sadly, I didn’t have any basil either)

1  Cook pasta according to package directions.

2  Put tuna and oil from can into a small heatproof bowl and gently flake with a fork.  Add beans, capers and lemon juice.  Stir to combine, taking care not to crush beans.  Ladle in 1/2 cup of boiling water from pot with pasta.

3  Drain pasta and return to pot.  Add tuna mixture and olive oil and toss gently.  Sprinkle with Parmesan, top with basil and serve warm.

(They estimated 4 servings at 611 calories each.)